
An Eclipse environment for C++/Qt programming
This semester I’m taking part in a programming project using C++, the goal is to develop a tool to help students of Numerical Analysis better understand numerical algorithms. Perhaps I’ll talk a bit more about this project in another post. Well, what matters is that we chose Eclipse (with the CDT plugin and Qt integration) as our development environment.
As I had to install these things, I decided to take the chance to record a screencast of the whole process and put it on youtube. I also wrote this tutorial. For those who are newcomers to C++ from Java land, this might a good IDE alternative. Let’s work then!
1. Optional: Install SVN plugin (Subversive)
For those who don’t know it, Subversion (SVN) is an excellent Version Control System. It facilitates the work of several people together in a programming project, without the pains of getting in the way of each other. Also, any change to the source code made through SVN is completely reversible. Eclipse can use SVN with the Subversive plugin. To install Subversive’s most recent version, follow these steps:
Go to Subversive’s official site, and to the downloads section;
In “Latest Release”, copy the update-site URL;
In Eclipse, go to Help → Software Updates → Available software;
Click “Add site” and paste the update-site URL, then click OK;
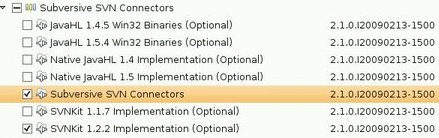
Select for installation the items according to the picture below:

Install them and restart Eclipse when asked;
Now we are going to install the SVN Connectors. They are necessary, without installing them you’ll be UNABLE to connect to any repository;
Copy this update-site, it’s from the official development team;
Repeat the same procedure to add the update-site to your Eclipse and install the items according to the picture below:
Restart Eclipse when asked.
2. Install the Eclipse CDT plugin
CDT (C/C++ Development Tooling) is the Eclipse plugin containing all needed tools to handle C and C++ development, such as: Auto-complete, Compilation, Syntax highlight, Project Import/Create wizards, Refactorings, etc. To install CDT, let’s use the official development team’s update-site:
At CDT’s official website, copy the update-site URL of the most recent version;
Do the same procedure as before to add the update-site into your Eclipse;
At this time, select the components to be installed according to the following picture:
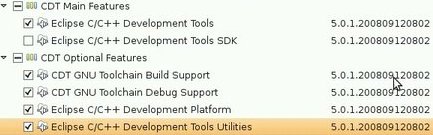
Confirm the installation and restart Eclipse when asked.
3. Install Qt development packages
If you managed to follow the tutorial up to this point, you have a complete C/C++ development environment in your Eclipse. Now, to be able to develop using the Qt framework, you must install the Qt packages into your system. If you are a Windows user, there are Windows installation instructions in the Qt downloads homepage. If you use a Linux distro, you can either install your distro’s packages for Qt development OR compile the whole framework from source. As an example, in this tutorial I’m going to install the Qt development packages for Ubuntu Linux. To install all of them, one command is enough:
sudo aptitude install qt4-{dev-tools,demos,qtconfig,doc,designer,assistant,linguist} ~nlibqt44. Install “Qt Eclipse Integration”
Qt Eclipse Integration is a plugin developed by Trolltech (Qt’s owner) to turn Eclipse into a complete Qt development environment. With this plugin you can create and edit UI forms, create and import Qt projects and use Qt’s build tools from inside Eclipse. The installation steps are as follows:
Go to the Qt Eclipse Integration downloads page;
Move the downloaded package to the folder where is located your “eclipse” folder. For example, my eclipse folder is /home/joao/eclipse, so the downloaded file must go to /home/joao;
Unpack the downloaded file using the command:
tar xzf <nome-do-arquivo>Run Eclipse through the command-line with the “-clean” option. Like this:
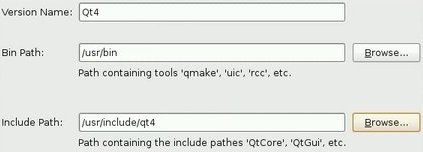
./eclipse -cleanGo to Window → Preferences → Qt, and put there the path to the folders where Qt is installed, according to the picture below:
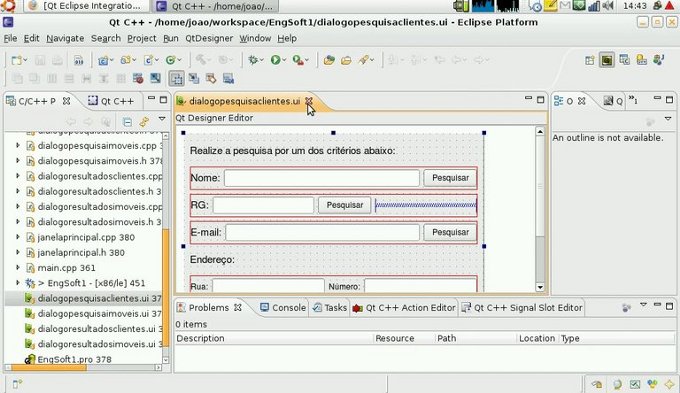
Now ready to go! Here’s a sample of the plugin at work:
This tutorial’s video on YouTube:
As I said before, I also recorded a screencast of this tutorial, with annotations explaining the whole process step-by-step. For those more visually inclined, here is the link: